Interactive web applications with htmx and Spring Boot

Thomas Schühly’s server-side rendering journey started as a developer trying to make life easier while developing his first bootstrapped product in his free time. Creating Spring ViewComponent enabled him to be the youngest Speaker at the largest European Spring conference and build awesome software full-time with his open-source library at alanda.io. He regularly talks at Java User Groups about htmx and server-side rendering with Spring while contributing to the open-source community. PhotoQuest
Nowadays Spring is typically only used for JSON API backend development.
We build the web frontend with a JavaScript framework, but why?
Probably everyone has experienced that JavaScript headache when it behaves like a well-tested modern language:

htmx to the rescue
htmx enables us to create interactive web applications with server-side rendered templates without JavaScript.
It enables interactivity by swapping parts of the DOM when new information is requested from the server.
We leverage the REST constraint "Hypermedia as the Engine of Application State".
With HATEOAS we don't send JSON to the Browser and render the page on the client.
Instead, the Server provides the presentation of information (HTML) and the application control information embedded within (htmx attributes).

This decouples the client and server at the network level.
It enables the server to evolve independently from the client, as the server provides the data and how to interact with the server based on that data.
Spring UserManagement Application
We have a table of users and we want to be able to edit users only with the power of HATEOAS and htmx.
We are using JTE as the server-side template language. CSS is omitted for the sake of readability.
Display a List of Users
We add an easyUserList attribute to our MVC model.
(I explain the MVC pattern here Spring MVC explained: Spring I/O 2023.)
We also define a constant for the UserTable ID and an ID for a modal container.
// UserController.java
@Controller
public class UserController {
  public static final String MODAL_CONTAINER_ID = "modalContainer";
  public static final String USER_TABLE_BODY_ID = "userTableBody";
  @Autowired
  private final UserService userService;

  @GetMapping("/")
  public String userManagement(Model model) {
    model.addAttribute("easyUserList", userService.findAll());
    return "UserManagement";
  }
}
We add this easyUserList as a parameter to the template.
In the table body, we loop over the easyUserList and call the userRow JTE template.
<!-- UserManagement.jte -->
@import static de.tschuehly.easy.spring.auth.controller.UserController.*
@param List<EasyUser> easyUserList
<table>
    <!-- thead omitted -->
    <tbody id="${USER_TABLE_BODY_ID}">
    @for(var user: easyUserList)
        @template.userRow(easyUser = user)
    @endfor
    </tbody>
</table>
<div id="${MODAL_CONTAINER_ID}"></div>
Display one User as Table Row
The UserRow template defines an EasyUser parameter and a local variable with the exclamation mark JTE expression: !{var name = value} .
<!-- UserRow.jte -->
@import de.tschuehly.easy.spring.auth.domain.EasyUser
@import static de.tschuehly.easy.spring.auth.controller.UserController.*
@param EasyUser easyUser
!{var uuid = easyUser.uuid.toString();}
<tr id="user-${uuid}">
    <td>
        ${uuid}
    </td>
    <td>
        ${easyUser.username}
    </td>
    <td>
        ${easyUser.password}
    </td>
    <td>
        <button hx-get="${URI(EDIT_USER_MODAL,uuid)}"
                hx-target="#${MODAL_CONTAINER_ID}">
            <img src="/edit.svg">
        </button>
    </td>
</tr>
As you can see we are using static constants heavily, to make it easy to understand what controller mappings htmx sends requests to.
hx-get="${URI(EDIT_USER_MODAL,uuid)} creates an HTTP get request to /user/edit/{uuid} when the button element is clicked. The uuid variable is interpolated with a static URI method we will define next.
hx-target="#${MODAL_CONTAINER_ID}" tells HTMX to swap the response body with the element that has the id value "modalContainer".
If we now go to the localhost:8080 we can see the table rendered:

Edit User attributes
// UserController.java
@Controller
public class UserController {
  @Autowired
  private final UserService userService;

  public static final String MODAL_CONTAINER_ID = "modalContainer";
  public static final String EDIT_USER_MODAL = "/user/edit/{uuid}";

  public record UserForm(String uuid, String username, String password) {}

  @GetMapping(EDIT_USER_MODAL)
  public String editUserModal(Model model, @PathVariable UUID uuid) {
    var user = userService.findById(uuid);
    model.addAttribute("userForm", new UserForm(
        user.uuid.toString(), user.username, user.password
    ));
    return "EditUserForm";
  }

  public static String URI(String uriTemplate, Object... variables) {
    return new UriTemplate(uriTemplate)
        .expand(variables).toString();
  }

}
The EDIT_USER_MODAL endpoint adds a UserForm record to the model with the values retrieved from the UserService.
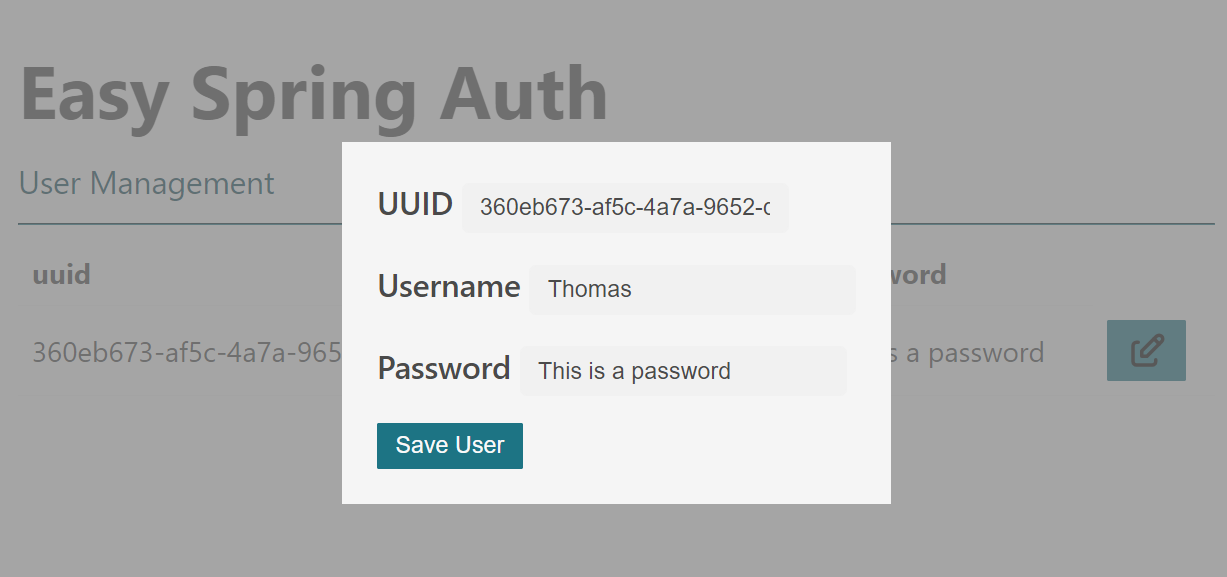
The EditUserForm.jte template displays a form with an hx-post attribute to "/create-user" that we reference by the static constant "CREATE_USER".
<!-- EditUserForm.jte -->
@import static de.tschuehly.easy.spring.auth.controller.UserController.SAVE_USER
@param de.tschuehly.easy.spring.auth.controller.UserController.UserForm userForm
<form>
    <label>
        UUID
        <input type="text" readonly name="uuid" value="${userForm.uuid()}">
    </label>
    <label>
        Username
        <input type="text" name="username" value="${userForm.username()}">
    </label>
    <label>
        Password
        <input type="text" name="password" value="${userForm.password()}">
    </label>
    <button type="submit" hx-post="${SAVE_USER}">
        Save User
    </button>
</form>
When clicking on the edit button the EditUserForm is rendered in the modalContainer.
Save changed User attributes
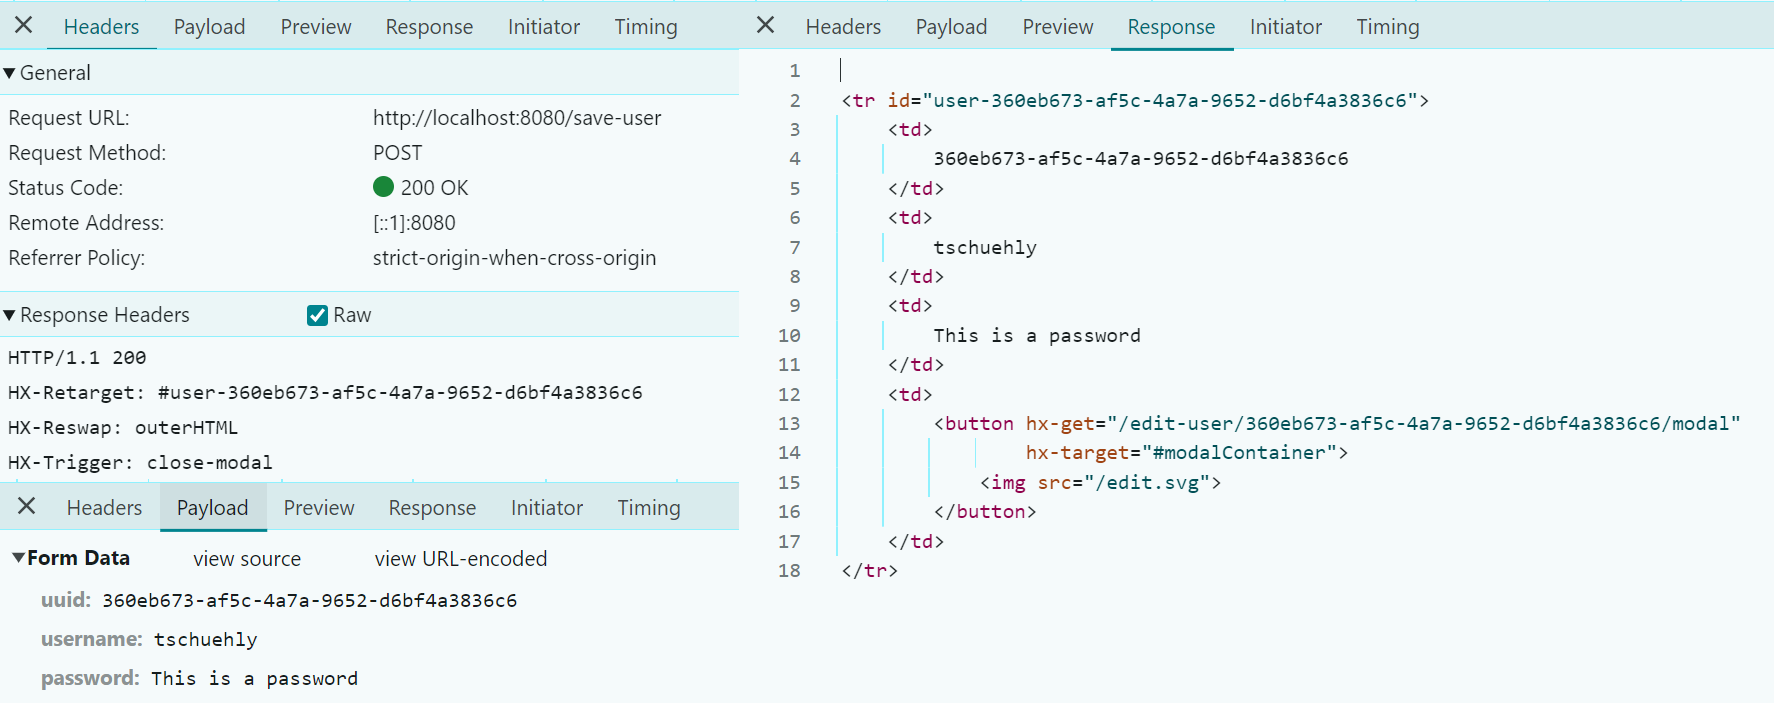
In the controller method, we save the user and add the saved user to the model.
We add HX-Retarget = #user-${user.uuid}to target the table row <tr> element that contains the user we just edited.
With HX-Reswap = outerHTML we tell htmx to swap the whole table row.
@Controller
public class UserController {
  public static final String SAVE_USER = "/save-user";
  public static final String CLOSE_MODAL_EVENT = "close-modal";

  @PostMapping(SAVE_USER)
  public String saveUser(UUID uuid, String username, String password, Model model,
      HttpServletResponse response) {
    EasyUser user = userService.saveUser(
        uuid,
        username,
        password
    );
    model.addAttribute("easyUser", user);
    response.addHeader("HX-Retarget", "#user-" + user.uuid);
    response.addHeader("HX-Reswap", "outerHTML");
    response.addHeader("HX-Trigger", CLOSE_MODAL_EVENT);
    return "UserRow";
  }
}
With HX-Trigger = close-modal we tell htmx to trigger a JavaScript event close-modal in the browser when the HTTP response is received.
We add an hx-on: attribute to clear the innerHTML of the modalContainer to remove the HTML from the DOM when the event is triggered.
<div id="${MODAL_CONTAINER_ID}"
     hx-on:$unsafe{CLOSE_MODAL_EVENT}="this.innerHTML = null">
</div>
If we click the Save User button and go to Chrome DevTools we can see HATEOAS in action.
The new application state after saving the user is transferred via HTML to the browser.
We have created a fully interactive web application without leaving our lovely JVM!
You can find the source code of this tutorial at github.com/tschuehly/easy-spring-auth.
If you have questions ping me on twitter.com/tschuehly.
If you want to learn more about server-side rendering with Spring Boot you can find more information here: github.com/tschuehly/fullstack-with-spring
If you want to learn more about HTMX + Spring Boot check out my series Web development without the JavaScript headache with Spring + HTMX.
My side business PhotoQuest is also built with HTMX + JTE